Mechanical keyboards have experienced a massive resurgence in popularity over the last decade, transitioning from niche office accessories to mainstream staples for gamers, software developers, and remote professionals. With premium models frequently commanding prices anywhere from $100 to upwards of $300, regular maintenance has evolved from a cosmetic chore into a necessary practice for protecting a significant hardware investment. Dust, skin oils, dead skin cells, pet hair, and microscopic food particles inevitably find their way beneath the keycaps of even the most meticulously maintained devices. Industry data indicates that the average desktop keyboard harbors significantly more bacteria per square inch than a standard household toilet seat if left uncleaned for extended periods. When left unchecked, this accumulated debris—often referred to in the community as "gunk"—can compromise switch actuation, degrade keycap legends, alter acoustics, and drastically shorten the lifespan of high-end switches and stabilizers. This comprehensive guide outlines the methodology, tools, and technical considerations required to restore a heavily used mechanical keyboard to factory condition, drawing from a case study of a two-year-old XTRFY K40 TKL RGB Hardware Canucks Edition.
The Anatomy of Keyboard Contamination and Tool Selection
Understanding the nature of keyboard contamination is the first step toward effective restoration. Environmental debris enters mechanical keyboards primarily through gravity and air currents, settling into the spaces between switches. However, the most stubborn grime—a sticky amalgam of sebum, sweat, and particulate matter—accumulates directly on high-traffic contact points such as the WASD cluster, spacebar, left Shift, and right Enter keys. Over a typical two-year usage cycle, this organic residue forms a dense film that not only impairs the tactile feel of the typing surface but also traps loose hairs and dust, creating localized blockages around stabilizer bars.
Selecting the appropriate toolkit is critical to avoiding permanent damage to sensitive electronics. While specialized keyboard cleaning kits are widely available through online marketplaces, many commercial bundles include redundant, low-quality instruments. A professional-grade, minimalist toolkit requires only household or easily sourced items: a wire or plastic keycap puller, a supply of cotton swabs, toothpicks, a firm-bristled paintbrush or clean toothbrush, a 50/50 mixture of isopropyl alcohol and distilled water, and a container of mild soapy water. Crucially, technicians must avoid using excessive liquids or harsh industrial solvents, which can strip away protective ABS keycap coatings, degrade plastic housings, or seep into the printed circuit board (PCB) and cause irreversible electrical short circuits.
Step-by-Step Disassembly and Structural Evaluation
The disassembly process varies significantly depending on the design architecture of the mechanical keyboard. Modern keyboards generally fall into two categories: floating-key designs, where switches sit exposed above a flat chassis, and traditional enclosed frames, which feature a removable top plate surrounding the switch housing. The XTRFY K40 TKL RGB represents the latter, requiring a systematic approach to gain full access to the internal chassis.
The restoration procedure begins with basic mechanical clearance. Technicians should invert the keyboard and gently tap the chassis to dislodge loose surface debris trapped between the switches. Following this preliminary phase, removing the keyboard’s top plate—if the model permits—provides unobstructed access to the perimeter edges and simplifies the keycap extraction process. Before removing any keycaps, capturing a high-resolution reference photograph or opening a digital layout diagram on an adjacent monitor is essential for ensuring accurate reassembly.
Keycap extraction must be executed with precision. Using a wire keycap puller minimizes the risk of scratching the textured plastic surfaces. Technicians must apply vertical, even pressure when pulling upward. For larger stabilized keys—such as the spacebar, Shift, and Enter keys—careful manipulation is required to release the wire stabilizer bars without snapping the delicate plastic inserts. Once removed, standard keycaps should be submerged in a lukewarm soapy bath for approximately 60 minutes to dissolve accumulated surface oils and stubborn organic films.
Chassis Restoration and Switch Maintenance
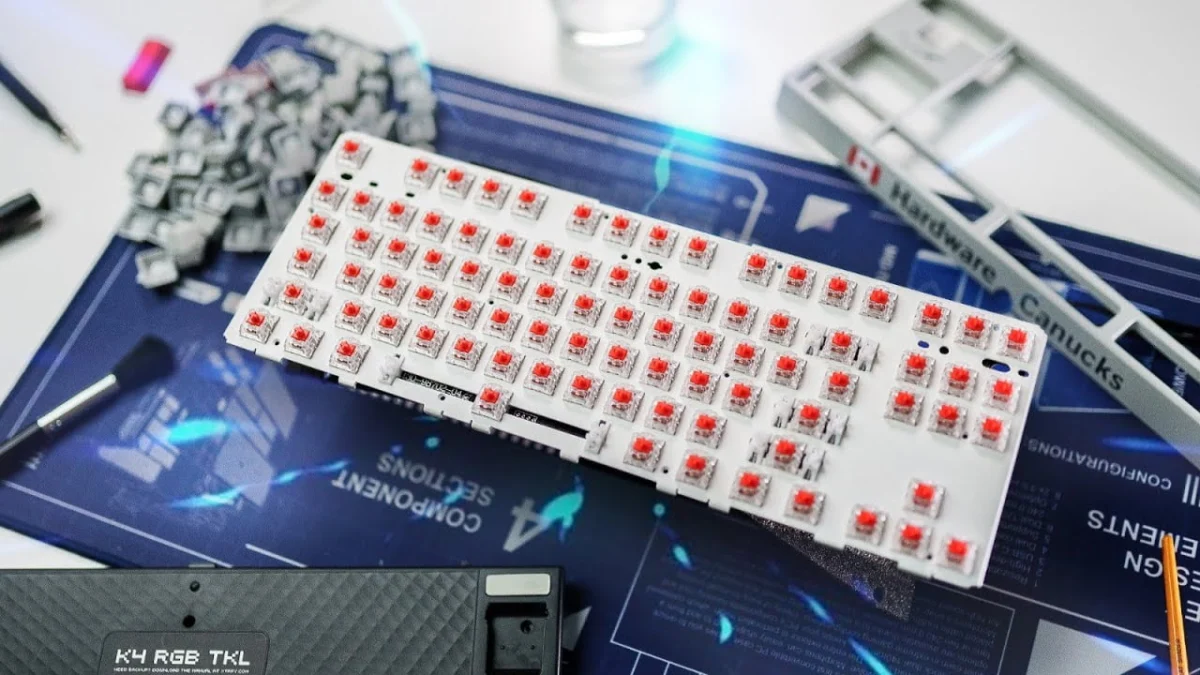
With the keycaps safely soaking, attention shifts to the keyboard base and internal assembly. For modular or semi-modular units, removing the external casing screws reveals the internal layout, often featuring sound-dampening foam designed to absorb hollow acoustic reverberations and improve the auditory profile of the switches.
Cleaning the switch plate requires a methodical approach to prevent driving debris deeper into the switch mechanisms. A firm, non-shedding paintbrush or specialized anti-static brush is ideal for sweeping away loose particulate matter. Technicians frequently observe that hair and dust tend to concentrate heavily around factory-lubricated stabilizer housings, where viscous lubricants bind loose fibers into dense clusters.
Addressing sticky, localized grime demands targeted chemical application. Cotton swabs dipped in a diluted isopropyl alcohol solution provide the necessary friction to dissolve hardened sebum without introducing excess moisture to the circuit board. Technicians must exercise caution around factory-applied switch and stabilizer lubricants; excessive scrubbing or aggressive solvent use can strip away necessary damping grease, resulting in rattling or scratchy stabilizer performance that requires manual re-lubrication.
Post-Cleaning Hygiene and Component Reassembly
The reassembly phase requires absolute thoroughness to ensure no cleaning residues remain trapped within the chassis. Washed keycaps must be extracted from their soapy bath individually, thoroughly rinsed in clean water, and tapped gently to expel trapped moisture from the interior stem cavities. Placing keycaps face-up on an absorbent kitchen towel for several hours guarantees complete air-drying before installation. Introducing damp keycaps to a sealed switch stem can introduce moisture into the housing, potentially leading to corrosion or electrical faults over time.
Prior to reattaching the top plate and keycaps, a final inspection of the base plate is mandatory. Technicians should perform a sweeping motion across the plate, moving debris outward rather than pushing particulate matter further down into the switch cavities. Once the chassis is verified as clean and completely dry, the top frame is secured, and the USB or wireless connection cable is re-established.
Reinstalling the keycaps proceeds systematically, beginning with anchor points such as the function row and large stabilized keys before filling in the alphabetical and numerical clusters. A final microfiber polish removes any fingerprint smudges or oils transferred during the handling process, returning the hardware to a pristine, out-of-the-box aesthetic state.
Broader Implications and Industry Best Practices for Hardware Longevity
The growing emphasis on peripheral maintenance reflects a broader shift toward consumer right-to-repair and hardware longevity. In an era dominated by electronic waste concerns, regular maintenance of durable goods such as mechanical keyboards, mice, and audio equipment significantly extends product life cycles, reducing the financial and environmental costs of premature replacement.
Industry analysts note that mechanical keyboards, unlike their membrane counterparts, are specifically engineered for modularity and repair. Features such as hot-swappable switch sockets, accessible chassis screws, and removable top plates are increasingly becoming standard selling points for manufacturers targeting enthusiast markets. By engaging in routine bi-annual or annual deep cleans, users protect their investments, maintain optimal tactile and acoustic performance, and prevent the accumulation of bacterial contaminants that pose secondary health concerns. Ultimately, responsible hardware stewardship transforms a tedious chore into an essential practice for maximizing the utility and enjoyment of high-performance computing peripherals.