A detailed maintenance operation recently brought an XTRFY K40 TKL RGB mechanical keyboard, a staple for its owner since its 2019 launch, back to near-pristine condition after two years of consistent use. The initiative underscores the critical importance of regular peripheral hygiene, not only for extending device longevity and maintaining optimal performance but also for enhancing the user experience. The XTRFY K40, specifically a Hardware Canucks Edition, presented unique challenges and opportunities during its thorough cleaning process, revealing the hidden accumulation of everyday contaminants that can significantly degrade a keyboard’s tactile feel and aesthetic appeal.
The Accumulation Challenge: Two Years of Grime
Over its two-year service life, the XTRFY K40 TKL RGB had accumulated a considerable amount of debris. While no significant spills had occurred, the natural ingress of dust, skin particles, hair, and microscopic food remnants had resulted in a noticeable layer of "gunk" on the keycaps and within the keyboard’s frame. This pervasive accumulation is a common issue for all frequently used electronic peripherals, particularly mechanical keyboards with their intricate switch mechanisms and open designs. Studies have shown that keyboards can harbor more bacteria than toilet seats, making periodic deep cleaning not merely an aesthetic endeavor but a crucial aspect of personal hygiene and health. The persistent build-up of grime not only makes a keyboard appear unkempt but can also affect keycap stability, switch actuation, and overall typing comfort. For mechanical keyboard enthusiasts, the tactile feedback and sound profile are paramount, and even minor obstructions can detract from the intended experience. The K40’s status as a Hardware Canucks Edition, a collaboration that likely signifies a specific aesthetic or set of features, further motivated its owner to restore its original luster and performance.
Preparation and Pragmatic Tooling for Peripheral Restoration
Approaching the task, the owner opted for a pragmatic methodology, relying on readily available household tools rather than specialized, often overpriced, keyboard cleaning kits. This approach highlights a common sentiment among tech enthusiasts who prefer effective, common-sense solutions. Essential tools for such a deep clean typically include toothpicks for tight crevices, Q-tips for precision cleaning, toothbrushes or small paint brushes for dislodging larger particles, and a keycap puller for safe keycap removal. Tweezers prove invaluable for extracting stubborn hairs. For cleaning solutions, a mixture of rubbing alcohol and water is highly effective for sanitizing and dissolving greasy residue on non-sensitive components, while soapy water is ideal for keycap immersion. The initial preparatory step involved inverting the keyboard and gently tapping it to dislodge loose debris, a simple yet effective method to tackle the superficial layer of accumulated particles before more intensive cleaning begins. This initial action alone can often remove a surprising amount of visible detritus, setting the stage for a more focused deep clean.
Disassembly: Unveiling the Hidden Grime
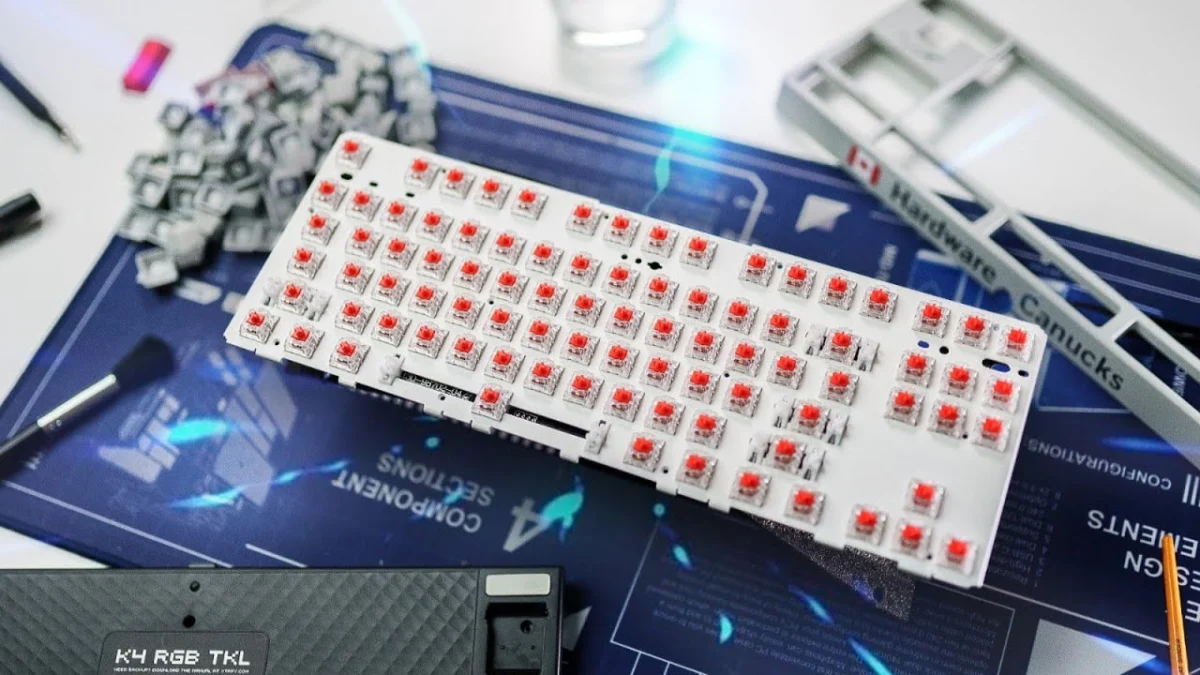
A significant advantage of the XTRFY K40 TKL RGB, and a feature not universally present in all mechanical keyboards, is its modular design allowing for the removal of the top plate. This characteristic proved instrumental in facilitating a comprehensive cleaning. Unlike keyboards with "floating style" keycaps, where switches are exposed and the cleaning process around them might appear simpler, the K40’s design typically encases the switches more, making direct access challenging without disassembly. The removable top plate provided unparalleled access to the keyboard’s internal frame and the areas immediately surrounding the switches, which are notorious for grime accumulation. This design choice by XTRFY not only aids in maintenance but can also contribute to the keyboard’s structural integrity and sound profile.
Prior to keycap removal, photographic documentation of the keyboard layout is a recommended best practice. This simple step prevents potential headaches during reassembly, particularly for less common layouts or custom keycap sets. Alternatively, accessing high-resolution product images online offers a visual guide, allowing for a more accurate and efficient re-placement of each keycap.
Keycap Decontamination: A Soapy Immersion
With the top plate removed, the process of detaching each keycap became significantly easier, especially for those located at the keyboard’s edges. Utilizing a keycap puller expedited this phase, ensuring that keycaps were removed without damage to their stems or the underlying switches. Particular care was exercised when removing larger keys, such as the Spacebar, Enter, and Shift keys, due to their integrated stabilizers. These stabilizers, designed to ensure even keypresses across a wider surface, require a delicate touch to prevent bending or breakage.
Once removed, the keycaps were subjected to a thorough soapy bath. This immersion serves a dual purpose: it effectively dislodges any grime clinging to the underside of the keycap near the stem and, crucially, helps dissolve the greasy film and accumulated gunk on the keycap surfaces. While initially, the keycaps appeared relatively clean, a closer inspection under magnification, as noted by the owner, revealed a pervasive and often sticky accumulation of microscopic debris and oils. This highlights how superficial appearances can be deceiving and underscores the necessity of a deep cleaning regimen. The choice of cleaning solution for keycaps is also important; while soapy water is generally safe for most keycap materials, care must be taken with harsh chemicals, especially on ABS keycaps, as they can degrade the legends or surface coating over time. PBT keycaps, known for their durability and resistance to shine, tend to be more forgiving in this regard.
Deep Cleaning the Core: Exposing the PCB and Stabilizers
Further disassembly involved removing a few screws to detach the keyboard’s top frame completely, revealing the internal components. Surprisingly, even within the seemingly sealed black frame, additional debris was discovered, emphasizing the ubiquitous nature of dust. A notable discovery during this phase was the presence of dampening foam within the keyboard’s hollow base. This foam, a feature often found in higher-end mechanical keyboards, plays a crucial role in reducing internal resonance and improving the acoustic profile of key presses. Its presence explained the keyboard’s "good sound" quality, validating XTRFY’s design choices. To ensure unobstructed access, the keyboard’s USB cable was temporarily disconnected.
The core cleaning of the base and PCB area commenced with a stiff-bristled paint brush, serving to dislodge larger particles such as hairs and significant dust bunnies. The distribution of grime was notably concentrated around high-traffic keys like the Spacebar, Enter, and the left Shift key, reflecting common typing habits and hand placements. The paint brush, while effective for initial removal, quickly became grimy itself, highlighting the sticky nature of the accumulated dirt. This "grimy" feel indicated the presence of oils and stubborn residue that required more than just dry brushing.
A particular challenge arose around the stabilizers, which are often factory-lubricated to ensure smooth operation. This lubricant, while beneficial for performance, can attract and trap hairs and other debris, creating a sticky, contaminated mixture. While care was taken not to remove excessive lubricant, the process necessitated careful cleaning around these components. Following the initial brushing, cotton swabs moistened with a mixture of rubbing alcohol and water were employed for a more targeted and abrasive cleaning. The alcohol component is vital here, as plain water would merely spread the greasy grime rather than effectively dissolving and lifting it. The grime proved to be remarkably tenacious, requiring significant physical scrubbing rather than simple wiping. This sticky residue was concentrated in predictable areas, such as around the Spacebar, left Shift, and right Enter keys. Conversely, areas like the WASD keys, surprisingly, remained relatively clean, suggesting different usage patterns or hand contact points. The effectiveness of the alcohol solution was evident in its ability to break down this stubborn film, restoring the base plate’s surface to a smooth, non-sticky texture.
Washing and Drying the Keycaps: The Final Immersion
After the keyboard base had been meticulously cleaned, attention returned to the keycaps, which had been soaking in soapy water for approximately an hour. This extended soak allowed the soap solution to penetrate and break down the accumulated grease and dirt. The drying process was equally methodical: each keycap was individually removed from the soapy bath, tapped to expel residual water from its internal cavity, and then placed face-up on a kitchen towel to air dry. It was crucial to replace the soaking water multiple times to prevent re-depositing dissolved grime or soap residue back onto the keycaps. The owner undertook a comprehensive cleaning of each keycap, addressing all five visible sides to ensure no lingering gunk remained, particularly on the often-overlooked lateral surfaces. This meticulous approach ensures that when the keycaps are reinstalled, they are truly clean, both externally and internally.
Finishing Touches and Reassembly: The Return to Pristine Condition
With the base plate clean and the keycaps dry, the transformation was immediately palpable. The previously sticky and grimy surface around the switches now felt smooth and clean. The white base plate of the XTRFY K40 made the visibility of the former grime stark, accentuating the dramatic improvement. The USB cable was reconnected, and a final sweep of the base plate was performed before the top frame was reattached, ensuring no stray particles had settled during the drying phase. The technique of brushing "up or down" away from the board, rather than across it, was crucial to effectively expel any remaining debris. This final inspection ensured that the internal components were entirely free of contaminants, essentially bringing the keyboard back to a "brand new" state.
The reassembly of the keycaps, often considered the least favorite part of the cleaning process, was systematically approached. Utilizing the previously referenced online image of the keyboard layout, the owner began with familiar keys such as the F-row, and the larger Control, Enter, and Shift keys, before filling in the remaining alphabet and number keys. This methodical approach minimizes errors and expedites the process. As a final step, each keycap received a gentle polish to remove any smudges or residues left during handling, culminating in a truly factory-fresh appearance. The ease of this overall process was significantly aided by the K40’s removable top plate, which simplified access to the switches. For keyboards with a "floating style" design, where switches are inherently more exposed, the initial access might be simpler, though cleaning around the switches still demands precision. A critical lesson learned was the importance of using tools that do not shed bristles or leave residue, as these can introduce new contaminants requiring additional cleaning. Furthermore, moderation in the use of liquids, especially near the PCB, is paramount to prevent electrical damage. Caution with alcohol on ABS keycaps was also noted, as it can potentially strip some coatings.
The XTRFY K40’s design, with easily accessible screws and no hidden rubber feet, further simplified the disassembly and reassembly, highlighting thoughtful engineering from the manufacturer. This deep clean did not extend to disassembling individual switches or fully re-lubricating stabilizers, demonstrating that significant improvements can be achieved through less invasive methods. Despite the rigorous cleaning, ample stabilizer lubricant remained, preserving the keyboard’s smooth operation.
Broader Implications: The Value of Peripheral Maintenance
This comprehensive restoration of the XTRFY K40 TKL RGB serves as a compelling case study for the broader importance of routine peripheral maintenance. Beyond the immediate satisfaction of a clean device, several key implications emerge:
- Extended Device Lifespan: Regular cleaning prevents the accumulation of corrosive elements (like skin oils mixed with dust) and physical obstructions that can prematurely wear down switches, keycaps, and internal components. This directly translates to a longer operational life for the keyboard, delaying the need for costly replacements.
- Enhanced Performance and User Experience: A clean keyboard restores the original tactile feedback of mechanical switches and the intended sound profile. The elimination of sticky grime ensures smooth key presses, free from resistance or inconsistent actuation, significantly improving typing comfort and gaming responsiveness.
- Improved Hygiene and Health: As previously noted, keyboards can be breeding grounds for bacteria and other pathogens. Periodic deep cleaning dramatically reduces microbial loads, contributing to a healthier workspace and mitigating the risk of illness.
- Economic Savings: Proactive maintenance is almost always more cost-effective than reactive repairs or full device replacement. The investment of time and inexpensive household supplies for cleaning far outweighs the expense of purchasing a new high-quality mechanical keyboard.
- Sustainability and Responsible Ownership: Embracing a culture of maintenance aligns with principles of sustainability, encouraging users to get the most out of their electronics rather than contributing to the e-waste problem. It fosters responsible ownership and appreciation for the technology we use daily.
Expert Recommendations and Best Practices
While the owner’s pragmatic approach proved highly effective, industry experts often offer additional recommendations for maintaining optimal keyboard hygiene:
- Frequency: For heavy users, a light clean (vacuuming, wiping keycaps) weekly and a deep clean (disassembly, washing keycaps) every 3-6 months is often recommended.
- Cleaning Agents: Always test cleaning solutions on an inconspicuous area first. For keycaps, gentle dish soap and water are generally safe. For the PCB and switch area, 70% isopropyl alcohol is preferred over higher concentrations, as it evaporates slower, allowing more contact time to dissolve grime, and is less aggressive on plastics.
- Tools: Invest in a good quality keycap puller. Soft-bristled brushes are ideal for switches, while microfibre cloths are excellent for final polishing without leaving lint.
- Stabilizer Care: If cleaning around lubed stabilizers, be mindful not to remove too much lubricant. If re-lubrication is necessary, use specialized dielectric grease or specific switch lubricants.
- Moisture Control: Ensure all components are completely dry before reassembly to prevent short circuits or corrosion. Air drying, sometimes aided by a fan, is preferable over heat sources.
Conclusion
The successful restoration of the XTRFY K40 TKL RGB mechanical keyboard exemplifies the tangible benefits of a thorough and methodical cleaning process. The keyboard, now in a condition akin to when it was first acquired two years prior, stands as a testament to the efficacy of proactive maintenance. The improved tactile feedback, aesthetic appeal, and overall cleanliness underscore that even well-used peripherals can be brought back to their original glory with a bit of dedication and the right approach. This initiative serves as a valuable reminder for all keyboard owners: cleaning your keyboard responsibly is not just about aesthetics; it’s about preserving performance, promoting hygiene, and extending the life of a valuable tool. The experience encourages a dialogue among enthusiasts on shared cleaning practices and innovative solutions for maintaining these essential pieces of our digital lives.